

사실 만들기로 해놓고 이런저런 이유로
안하다가 이제 더이상은 피할 수가 없어서
만들기로했다....
음....
아버지 비닐 하우스가 집에서는 멀지만
와이파이가 된다.
개이득?
암튼 그래서 홈어시스턴트를 이용해서 컨트롤하려고
esp32 모듈도 있겠다
전역하고 할 거없는 백수라 ....
계획(시스템)
1.일정 온도 이상이면 열림
2. 특정 시간에 열림 닫힘
3.끝

왼쪽 상단에 있는게 L298N 모터 드라이버 모둘이다.
제작
사실 컨트롤 박스가 아직 없어서 안 만들다 이제 만들었다

먼저 모터 드라이버에서 공급 전압이 24v로 5v전압을 넘어가서
빨간 부분의 핀을 제거해 드라이버에 공급할 전원 5v를 따로 넣어주어야한다.
암튼 핀 제거 후 모터를 컨트롤할 핀을 납땜해서 고정했다.
저게 바로 납땜을 하면 쉽지 않은데
먼저 피복을 벗기고


두가닥의 선을 벌려서 꼬아준다.
무작정 꼬면 제대로 꼬이지 않고
한가닥을 중심으로 나머지 한가닥이 주위를 감는 모양이다
그러면 모양도 이상하고 제대로 고정이 안된다.
벌릴 수록 촘촘하게 된다.
(군대에서 하다보니 터득함)

꼬으면 이런 모양이고

끝은 절단한다.
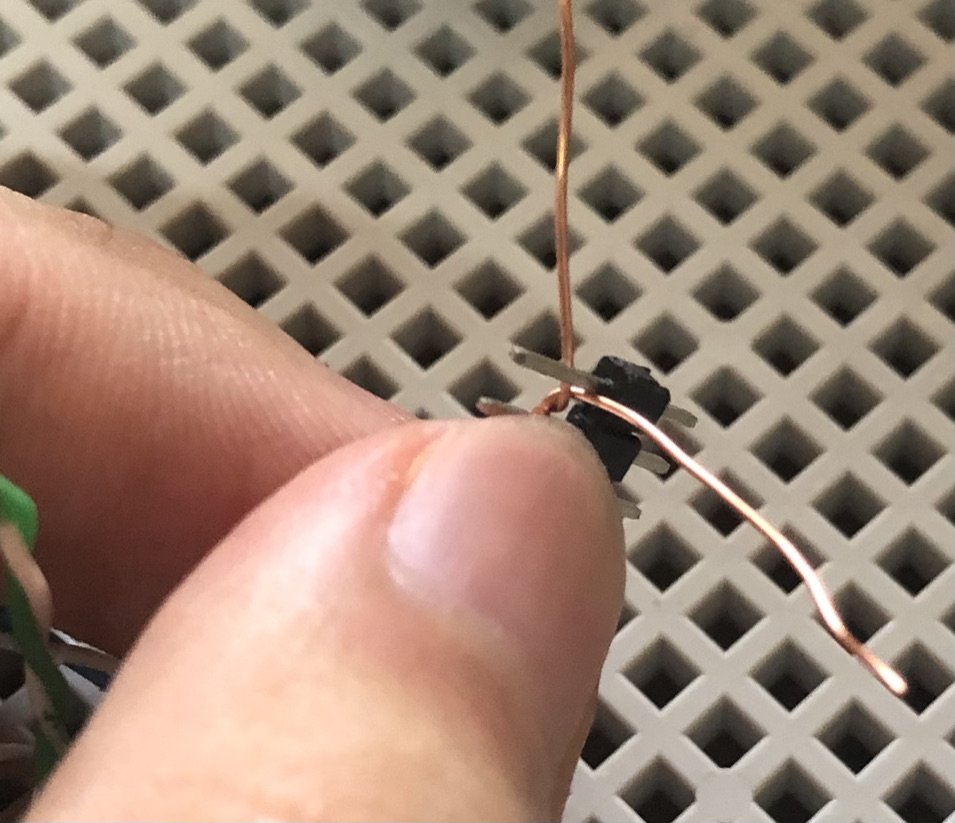
꼬다가 중간에 같은 크기의 핀을 끼우고
다시 꼬으면

중간에 핀 크기의 구멍이 만들어진다.

핀에 끼우고 납땜을 하면 쉽게 고정된다.

보드는 동본 핀들로 고정하는데 반대 방향으로 납땜했다.


24v선을 파란 부분에 물려야 해서
빨간 박스 안의 선 2개는 드라이버 뒷면의 납땜부분을 녹여서 같이 붙였다.
모터 드라이버에 5v를 공급하는 선이고
24v 전력 공급장치에 -가 있지만 esp32 보드에도 물려야 정상 적동한다.(이유는 모름 경험임)
그래서 파란 선을 납땜했다.


달라스 온도 센서도 달았다
이 상태는 두 모듈이 달랑달랑 거리니
저~~~~~~~~~번에 구매한 사나고 펜을 이용해서
플라스틱 못처럼 만들어 고정하기로했다.


콘센트까지 일단은 넣음.
이제는 코오오오드으으으
//하우스 개폐기

#include <WiFi.h>
#include <PubSubClient.h>
#include <OneWire.h>
#include <DallasTemperature.h>

#define ONE_WIRE_BUS 4
OneWire oneWire(ONE_WIRE_BUS);
DallasTemperature sensors(&oneWire);

const char *ssid =  "olleh_WiFi_BA83";
const char *password =  "0000002583";

const char* ID = "걔폐기";  // Name of our device, must be unique
const char* TOPIC = "house/right/motor/pos";
const char* INTOPIC = "house/right/motor/set";
const char* TEMPTOPIC = "house/temperature";
const char* mqttUser = "dragon";
const char* mqttPassword = "qazwsxedcrfvtgbyhnujm";
const char* broker = "59.22.159.5";

WiFiClient wclient;
PubSubClient client(wclient);
char messages[50];
char tempers[50];
int Motor_open1 = 12;
int Motor_close1 = 13;
int Motor_open2 = 26;
int Motor_close2 = 27;
int setTime = 0;
int preTime = 0;
float tem = 0;
float tem1 = 0;

// Connect to WiFi network
void setup_wifi() {
  Serial.print("\nConnecting to ");
  Serial.println(ssid);

  WiFi.begin(ssid, password);
  while (WiFi.status() != WL_CONNECTED) {
    delay(500);
    Serial.print(".");
  }
  Serial.println();
  Serial.println("WiFi connected");
  Serial.print("IP address: ");
  Serial.println(WiFi.localIP());
}

void callback(char* topic, byte* payload, unsigned int length) {
  Serial.print("Received messages: ");
  Serial.print(INTOPIC);
  String msg = "";
  for(int i=0; i<length; i++){
    Serial.println((char)payload[i]);
    msg += (char)payload[i];
  }
  Serial.println(msg);
  setTime = 100 * msg.toInt();
  if (setTime > preTime) {
    digitalWrite(Motor_open1, HIGH);
    delay(setTime - preTime);
    digitalWrite(Motor_open1, LOW);
    digitalWrite(Motor_open2, HIGH);
    delay(setTime - preTime);
    digitalWrite(Motor_open2, LOW);
  } else if (setTime < preTime) {
    digitalWrite(Motor_close1, HIGH);
    delay(preTime - setTime);
    digitalWrite(Motor_close1, LOW);
    digitalWrite(Motor_close2, HIGH);
    delay(preTime - setTime);
    digitalWrite(Motor_close2, LOW);
  }
  preTime = setTime;
  setTime = setTime / 100;
  Serial.println(setTime);
  snprintf(messages, 75, "%ld", setTime);
  client.publish(TOPIC, messages);
}


// Reconnect to client
void reconnect() {
  // Loop until we're reconnected
  while (!client.connected()) {
    Serial.print("Attempting MQTT connection...");
    // Attempt to connect
    if (client.connect(ID, mqttUser, mqttPassword)) {
      Serial.println("connected");
      Serial.print("Publishing to: ");
      Serial.println(TOPIC);
      Serial.println('\n');
      client.subscribe(INTOPIC);

    } else {
      Serial.print("failed, rc=");
      Serial.print(client.state());
      Serial.println("\n try again in 5 seconds");
      // Wait 5 seconds before retrying
      delay(5000);
    }
  }
}

void setup() {
  Serial.begin(115200);
  pinMode(4, INPUT);
  pinMode(Motor_open1, OUTPUT);
  pinMode(Motor_close1, OUTPUT);
  pinMode(Motor_open2, OUTPUT);
  pinMode(Motor_close2, OUTPUT);
  delay(100);
  setup_wifi(); // Connect to network
  client.setServer(broker, 1883);
  client.setCallback(callback);
  sensors.begin();
}

void loop() {
  if (!client.connected()){
    reconnect();
  }
  client.loop();
  sensors.requestTemperatures();
  tem = sensors.getTempCByIndex(0);
  if (tem != tem1) {
    if (tem < -55) {
      tem = tem1;
    }
    tem1 = tem;
    Serial.println(tempers);
    snprintf(tempers, 75, "%f", tem);
    client.publish(TEMPTOPIC, tempers);
  }
}
이 친구는 아두이노 코드임 알겠지만 ㅋ
개폐기 열린 정도 백준률을 홈어시스 턴트에서 받아오면 그걸 시간으로
환산해서 모터 작동시간을 딜레이로 조절하고
모터 드라이버가 고전압일 경우 한번에 전류를 모터 2개에 공급하게에는
성능이 너~~~~~~~무 좋아서
하나하고 하나 하도록 했다.
#개폐기
cover:
    platform: mqtt
    name: "개폐기"
    command_topic: "house/right/motor/set"
    position_topic: "house/right/motor/pos"
    set_position_topic: "house/right/motor/set"
    payload_open: "100"
    payload_close: "0"
    retain: true

# 하우스 온도
sensor:
  - platform: mqtt
    name: "하우스 온도"
    state_topic: "house/temperature"
    unit_of_measurement: "℃"
    device_class: temperature
이건 홈어시스턴트 configuration.yaml 코드

앙~~~ 잘 작동하누
담에는 콘트롤 박스에 구멍 뚤어서 설치까지

사실 모터B가 작동 안되서 고민하고 문제 찾다가
모터B 컨트롤핀 D26, 27 셋업에서 핀모드 안열어줘서
안된거 였음.
난 뷰웅신인가? ㅋㅋㅋㅋㅋ
시마이
'스마트 홈 > esp32' 카테고리의 다른 글
| ESP32-DHT11 집 온도와 습도 측정! (0) | 2021.07.03 |
|---|---|
| ESP32-CAM 외장 안테나 달깅! (0) | 2021.06.27 |
| esp32-cam 도착! (0) | 2021.06.26 |
| 구피 자동으로 밥주기 (0) | 2021.05.29 |
| 스마트 홈 구축 1 스마트 스위치 (3) | 2021.05.28 |